Daft Cunt

Joined: 01 Feb 2007
Posts: 838
Location: Toulouse, France
|
 Posted: Fri Feb 09, 2007 11:30 am Post subject: The Dubstep Production Forum Bible Posted: Fri Feb 09, 2007 11:30 am Post subject: The Dubstep Production Forum Bible |
  |
|
SAMPLES
Google trick to find samples on the internet:
let's say you need some snares, type in ?intitle:index.of? wav snare
Acapellas :
http://www.versionist.com/
http://www.acapellas4u.co.uk/
Percussion :
http://sizk.free.fr/donotremove/decklyn%20TJ%20Sampleswap.rar (thx to Decklyn)
http://thearmz.net/doa/
http://www.junglebreaks.co.uk/
http://www.bashtownbeats.com/300Breaks.zip
http://www.rah.gq.nu/bourbon/breaks1.html
Misc :
8.5 Gb of samples: http://wiki.laptop.org/go/Sound_samples (thx to z.u.bee for the link)
100s of samples links
http://sizk.free.fr/donotremove/Press_Samples_Pack.rar (thx to Press)
http://www.jackdunning.com/samples/untold_dubstepforumdotcom_drum_and_perc_pack.zip (thx to Untold)
http://hosted.filefront.com/psitech
http://www.darkbeats.com/sampleswap/
http://dnbwiki.com/index.php/Free_Samples
http://freesound.iua.upf.edu/packsView.php
THREADS ABOUT MONITORS
Decklyn's Guide To Monitors
http://www.dubstepforum.com/viewtopic.php?t=36045
http://www.dubstepforum.com/viewtopic.php?t=38443
http://www.dubstepforum.com/viewtopic.php?t=42869
http://www.dubstepforum.com/viewtopic.php?t=34069
http://www.dubstepforum.com/viewtopic.php?t=32362
http://www.dubstepforum.com/viewtopic.php?t=11930
http://www.dubstepforum.com/viewtopic.php?t=32045
THREADS ABOUT HEADPHONES
http://www.dubstepforum.com/viewtopic.php?t=42054
http://www.dubstepforum.com/viewtopic.php?t=40423
http://www.dubstepforum.com/viewtopic.php?t=38078
http://www.dubstepforum.com/viewtopic.php?t=36919
http://www.dubstepforum.com/viewtopic.php?t=27413
http://www.dubstepforum.com/viewtopic.php?t=27364
http://www.dubstepforum.com/viewtopic.php?t=18498
http://www.dubstepforum.com/viewtopic.php?t=10792
http://www.dubstepforum.com/viewtopic.php?t=12525
http://www.dubstepforum.com/viewtopic.php?t=14573
VST(i)s
The free VST Recommendations thread
Any synth will do for bass... man even my 8 year old son can make a phat bass using the shitist of vst's....try any synth with 2 oscs a low pass filt and an lfo...always start with the basics a sine wave...find the key u like, then layer with 2nd osc..play with tuning to see how the waves phase.... u can get some nasty growlls just by doing this....try tunning cents 25-50 with a square wave...
Albino
Trilogy, z3ta, bass station etc. Samples run through kontakt or esx24 as well boss.
fruity 3 x osc
The Korg MS-20 VSTi (part of the Korg Legacy package) is pretty brutal.
All i use for making bass is Absynth 3 now.
Ableton Operator
v-station...although pretty much any synth can make a nice fat bass, bass sounds are generally not that complex.
Reaktor. It's got a mind of its own sometimes though.
Native Instruments
Jus for the fact that you can load samples into absynth 3 man and run them alongside oscillators, endlesss possiblities. Or even just using it as a sampler. The filters and envelopes on it piss over a lot of other synths i have come across aswell.
Currently i make a lot of my patches on albino 2, kicks ass. Especially as you can assign the appregiator in the modulation matrix. Assigning to the filters can give mad results! Such a simple but powerful synth. Also use z3ta, absynth 3 quite a bit. Thats bout all i can think of, of the top of my head. Thats all good, but if you want to make really original sounds, its bout processing and layering and more layering and reprocessing your bass patches.
FREE VSTs
The Complete Freeware Softstudio Setup! (thx to futures_untold)
Big Thread of Free VST Plugins!
Good synths for soft,soulful,ambient sounds...
To kick off I've found the Tridirt Multiband distortion http://www.noizware.com/software.htm which seems to be pretty hot for beefing up drum sounds wth high and low adjustable frequencies and separate gains for all bands.
Probably seen it but http://www.knufinke.de/sir/index_en.html SIR convolution reverb - loads of impulses available to download for free off the net, you can also get interesting pads if you load wav files as an impulse and turn off the original signal.
Also recommend the Digitalfishphones site - good quality compressors, enhancers, etc http://www.digitalfishphones.com/main.php?item=2&subItem=1 - also some AU plugs for Mac users
kjaerhus do some cool freebies > www.kjaerhusaudio.com
and they actually sound decent too... classic filter (great workhorse filter) and teh classic phaser
just found this as well, tho i havnt tested it yet > www.tone2.com
tits called the bi filter, its got tonnes of different filter types and a few distortion options too, might be handy for mid bass mainpulation at least
Think there's some good stuff out there
http://bigtick.pastnotecut.org/index.php seems to be a right, nasty distortion device
And of course for various dub stylings where else but http://www.interruptor.ch/vst_overview.shtml, new version of Bionic Delay looks good, been using the original instead of the tape delay in Logic, as it has a well nice echo drift effect (have mentioned this before elsewhere, but quality goods)
http://www.preromanbritain.com/ymvst/
http://www.tweakbench.com/instruments.php?id=9
http://mda.smartelectronix.com/synths.htm
http://mda.smartelectronix.com/effects.htm
Synth1
http://www.kvraudio.com/get/214.html
Nice synth with arp and some fx. Lots of good presets if you download the banks.
The Buzzroom series of compressors : http://www.x-buz.com/BuzCompFree.html
TLS Saturated Driver : http://hem.bredband.net/tbtaudio/
NorthPole VST PC - Resonant Filter PlugIn : http://www.prosoniq.com/index.html
loaaads here: http://www.smartelectronix.com/
DISTORTION VSTS
Try greasetube, or if you have PSP vintage warmer turn up the knee know and the drive but keep an eye on the volume.
Izotope + Pluggo-bundle
Camel crusher... more like compression that turns into distortion but amazing on drums. fizzy on bass, but... FREE.
Antares tube
Here are some good ones:
Ohmboys Predatohm
Retroband
Voxengo Lampthruster
Voxengo AFTapebus
And some good freebies as well:
Audio Damage Fuzzplus
Noizware TriDirt
Christian Budde Christortion
Voxengo Tubeamp
GClip
Kingston RetroBand Lite
Smartelectronix Cyanide
Voxengo Boogex
Cyanide 2 does bad things to sounds
Camelphat 3 & predatohm
Deffo agree with the camelphat
Dead suprised that on-one's mentioned the psp vintage warmer yet tho - that plug is STANDARD in the studes.
Quadrafuzz
Destroyfx Polarizer is cool. It's a pretty standard bitcrusher, until you hit the 'implode' button. Does what it says on the tin.
I like Vintage Warmer (http://www.pspaudioware.com/plugins/vintage.html)
WOBBLE BASS EFFECT
++ Great basics tutorial by untold ++ http://www.dubstepforum.com/viewtopic.php?t=780&start=15
++ Other good one by decklyn ++ http://dubstepforum.com/viewtopic.php?t=16385
++ Kontakt method by deadly habit at the very bottom of this post ++
It's all about assigning the LFO of your synth to change when you adjust a certain parameter. For example you can set the lfo to change rate when you move the pitch bend on your keyboard. Higher pitch makes it go faster and vice versa.
You can also take a bassline and double it up and then pitch one up or down a little bit. The offtime phase cancellation will cause the sound to wobble. Also the speed of the wobble will increase or decrease depending on which note you hit next.
The other way is to sample a short clip of a bassnote with a amplitude or filter envelope on it. Then take that short sample, put it in your sampler and set it to loop. This will also achieve the same increase or decrease in wobble speed as described above.
The upside to those methods is that you still have your LFOs free to other interesting things and get more complex sounds.
Stick to synthesis for the time being, as pitching down samples will introduce other audible 'artifacts' to the sounds (to do with the aliasing and resolution of the sample), which will require further filtering to eliminate - unless you can set a higher sampling rate to get around this.
If u want more freedom than the boring old synced wobble you can draw an automation curve in the cc channel of your choice, assigned to filter cutoff knob
you can make sick morphing sounds this way, instead of being locked to straight sync on 1/4, 1/8, 1/16 etc.
With Albino assign a filter at the bottom and youll get extra wump wump.
Guitar pedal wah wah with diff rate release.
Cyclotron : http://www.device.arcanedevice.com/?sig_mod
SUBBASS
A sub consists mostly of one or more (detuned) sines, with additional overtones. for just a sub, use a sine. for a sub with some character (by using overtones), use square or saw (i prefer square) waves and detune them, then put them through a lowpass filter. you'll want a steep filter (24db) or use eq afterwards to make room for your kick. to get them wobblin you can use a sine lfo linked to the cutoff, but be careful to stay in the sub-range because you'll want a nicely defined kick with some meat and punch too, which will sit in the 80-120hz range. since hz*2 is the span of an octave, you'll want the ground-note of your sub (and thus your track) lying around 30-40 hz for maximum bass weight. then you have groundnotefrequency*2 as the room for your sub to accompany your mids or your melodies, which will be between 30-80hz. oh yeah, use some compression carefully (to avoid clicks) to pump it up.
1.Turn the filter right down
2.turn the resonance slightly above the filter
3.Higher notes are sometimes more 'bassy' than low ones
> for a sub with some character (by using overtones), use square or saw (i prefer square) waves and detune them.
Sorry to disagree... the Sub should be a pure Sine. Anything different from that is technically midrange. A square wave is just a Limited Sine, and the extra hummy metalic fuzz is definitely higher up the spectrum than the body of the sub.
When you filter a sound, it means you remove it's harmonics. Every single (harmonic) sound is constructed out of a lot of sinewaves, each varying in amplitude and pitch. The groundnote is the first of those sines, so when you lowpass a squarewave until about 40hz with a 24db slope, then you'll have something almost like a sine remaining. The difference is that there'll be some subtle differences between a lowpassed squarewave and a sine, since you won't cut off all of it's harmonics. A sine alone has no harmonics.
More info about harmonics: http://en.wikipedia.org/wiki/Harmonics
> since hz*2 is the span of an octave, you'll want the ground-note of your sub (and thus your track) lying around 30-40 hz for maximum bass weight.
You lost me there... What's a ground note? And do you mean that the frequency of a note, X2, gives you an octave from the original note? I guess to get 30-40hz will require different note pitches depeding on the sound...
When you write music, you'll find yourself using scales. for dancemusic (and dubstep in particular) there's often not a 'classic' scale present, but most of the time your track will have one particular note which is it's 'base' note. this is what i meant by groundnote. i could be wrong by calling it a groundnote since i don't really know for sure that's what it's called in English.
What I meant by freq*2 is that when you have a pitch of for example 30hz, the upper octave of this pitch will be at 60hz. when you go another octave up, it will be 120hz, etc. When you have a sub, you will want it to leave room for a decent kick which will lie in the range of 80-120hz. A (western) scale is always divided into an octave, so you'll need an octave to support your melody with your sub. When your 'base' note or groundnote as i called it is lying around 44hz, then you'll have 44hz to 88hz as a range for your sub. This might sound a bit cryptic and i really can't explain it better in english, but you could do some further reading at http://en.wikipedia.org/wiki/Frequency
It's hard to get a sub punchy without a click. It depends what kind of sub you want.
If you want more of a wooop sub (sorry can't write sounds) then I usually cut out any high frequencies, like the guy above said - put a filter on it and turn the frequency down to about 50hz or something.
EQ is also a good thing.
What I like to do is make sub in a synth, EQ and filter it and then export that - load it into soundforge and put a little (and just a little) PSP Maximiser (if you don't have this - get it, it's fucking ace) on it, then load that back in. You might have to EQ it some more or whatever.
A tiny bit of tape distortion on you sub before you export sounds nice also. Just make sure that the 'final' product is mono
you can try layering kicks over your sub - make sure you cut out the low frequencies otherwise they will clash. This is like a 'pseudo' punchy sub - it makes it sound like it's punchy, but really it's the kick that makes it punchy. But getting kicks/subs to sit well together is another subject man, it takes a bit of fucking around to make it sound right with EQ.
I don't use a synth. just generate tones in cool edit and then get to work on eq, filtering, distorting, pitch bending etc.... I doubt it makes much difference as both ways are just using an oscillator tone and adding effects.
As for EQing etc... depens on the sound but a nice dynamic EQ can give some nice timbres to the sound.
I usually use Novation V-Station (VST) for the sub.
With some eq'ing, maybe some PSP Vintage warmer and a little compression.
Or alternately I load up a nice fat 808 kick in Kontakt and eq it to suit.
Recently though, I've been using Albino..
Start with an blank patch..
Fire up a couple tracked sine waves and send it to filter 1 (low passed)
1 or 2 saws or triangles (possibly detuned) and send to filter 2 (high passed)
Overdrive filter 2.
Mix a small about of filter 2 into fliter 1 for grunt.
LFO mod to pitch
LFO mod to filter 2
Low pass the entire instrument.
Add a small amount of emu-tube distortion if needed. Compress to taste.
EQ - 24db/oct cut at >28(ish) boost frequency of the tunes key.. (or it's 3rd or 5th depending on what key) cut a pocket for the kick.. boost a bit of umph in the 130-170 range (depending if there is a "midbass" layer in the track or not)
GRIME BASS
A good trick for fatttening up your sound and introducing interesting harmonics is to copy the same MIDI part to two or more different instruments. That way all the parts are locked in the same rhythm but making different sounds and playing off of eachother. A couple of higher pitched elements can actually produce harmonics in the bass range. If I'm not mistaken, it's a technique that Macabre Unit uses to great effect.
A square or saw wave anyware from 40-60hz in a sampler should do it. Use a lowpass filter and tweak away. Use an EQ to cut the higher freq's out and boost what ever low end range your looking for. Compress carefully if needed.
Or just get a bassy sound out of any synth and again, cut the highs out and boost the lows just enough for it to hit as hard as you need it to.
MISC BASS PROCESSING
When using distortion i always seperate and layer my bass by frequency, the cleaner you want it the more your gonna have to layer. BUt leave the the sub frequencies (or anything below 80-90) clean.
a simple technique and can add depth and harmonics is:
to duplicate the midi notes, create a new instance of the bass synth with same patch but change the fillering to a high-pass or boast the resonance and play around the cut off.
also, get a parametric eq and scoop out the mids (200 - 500 hz) to achieve a "hollow" square bass effect. works damn well if you do it right... but eq before and after distortion in a send works great.
use a better filter than the albino, i suggest psp nitro
Try also running your basses through an analogue modeled compressor. Automate volume for more saturation color.
PSPs MixBass is one of my fav plugins for adding that grimey coloration.
CLANKING SOUND
You should be able to get some good results by pitch shifting a snare, adding reverb and distortion.
Get yourself a digital recorder, olympus makes a nice one (75 bills US). Take a day out and record the sounds around you. Trust me you'll find all sorts of audio gold. Process the hell out of them through whatever you use, repeat.
An FM synth should get you metalic/clangy sounds. As was said up thread go for the field recording if you can. You could do something as simple as recording you pots and pans. Slow the sample down and eq the unwanted freqs...
Try out the Ugo texture VST plugin
Its free and you can get some nice industrial sounds out of it.
Have you tried the FX unit Metallurgy? That is one wicked FX unit. This will mangle your sounds in a very good way.
DRUMS PROGRAMMING/PROCESSING
Reverb:
set up 2 reverbs on separate busses, then add a send for each bus to all your drums/percussion etc. Make one reverb a nice long/large-ish room one, and the other a shorter/drier one. Experiment with diff send amounts on each drum channel for both buses.
Using reverb in this way can help make your drumset sound 'cohesive'.
Snare----> Plate Verb or Spring to emphasise metallic sound -----> Compressed to fuckery with long release = Massive, epic, big balls snare.
Adjust the reverb time and release time on the comp to get the timing jamming nicely.
TRACK STRUCTURE
Give the DJ's something (clear. obvious. 16-32 bars long) to mix in and out of, and build a breakdown/drop for a really obvious build/release of energy.
Other than that, the middle's up for grabs.
Obviously each tune will develop and require different layouts and the only strict rule is keep your phrases built in 16 bar blocks.....
Maybe to get started try :
16/32 bar intro
64 bar main body 1
16 bar breakdown
49 bar main body 2
16 bar outro
Switch up the 1st 16 of the 2nd main body (chopped beat, varied bass??)
Keep adding and subtracting the elements...
THERE AINT A FORUMLA. Thats what you DnB heads need drilled into ur skulls..
- if u only draw inspiration from dubstep, then guess what, at best ur gonna end up soundin like every one else, I doubt u'd even get up to that level with out creativity and originality.
- Stop goin on about how many snares in a bar or where to put everything. It simply does not matter.
Like forensix said. - Learn reason before you learn dubstep. then we wont get a shedload of beats that sound like shite ha, and ppl askin if they're good. of course they wont be good, u'v used reason for 2 fakin days !
Dubstep is still one of the most open ended genre titles [thank fuck] use that freedom to see where you can take it, rather than seeing it as a negative constraint to which you must adhere to at all costs. Better still aim to make the best music you can, and if it fits the bill great it'll go in the dubstep section at yr local shop, in all honesty though is that really gonna make it any better a tune than it going in any other section?
This is a creative art, so get creative.
Freedoms a good thing. Conformity isn't going to get you any props in music.
COMPRESSING/EQing
Good topic:
http://dubstepforum.com/viewtopic.php?t=17132
Decklyn's Sidechaining Tutorial for Cubase SX2 or SX3
Compression Technique Parallel and the NY Trick By Decklyn
Basically you need to understand the concept of compression. By playing with the threshold you can make the quiet parts louder and the loud softer, it basically evens out your mix. With that said, if your bass has a constant amplitude you may not need compression at all. Compression can be very useful with vocals, especially when the singer varies the loudness of their voice. I hope that helps a little.
Compressing bass is a difficult thing to master, and for that reason it might be easier to use a compressor or limiter with presets. I don´t understand why some suggest not to compress bass, but each to their own. Compression in general is a bit difficult to understand and master, however trial and error is the key in this case.
Depending on the bass you might want to try with:
a ratio of 3:1 to 12:1, depending on how "hard" you want the compressor to compress, when the threshold is reached.
A threshold value is really not possible to tell, as it depends on the overall level of your bass. But you might adjust the threshold so the compressor starts to gain reduct around 3-8 dB. Remember, this is just an idea.
Attack and release (and hold) is a bit more difficult, as this is the hardest thing to master. If possible, use auto on both, otherwise use a fast attack if you want the compressor to react quickly when the threshold is reached and vice verca. The same applies for release.
Sometimes a "soft knee" option is included, however I usually tend to stick to "hard knee". This is a bit technical, so if possible, get hold of a compressor with a good user interface and hopefully a "drawing" of your threshold curve. Via this you can tell the difference between hard and soft knee (look at the point of threshold).
I tend to compress quite heavily, depending on the type of bass needed. But if you just want to play around a bit, then go for gain reduction on the compressor at around 3-6 dB (or more, if you want to squash it).
Remember to use the make-up gain! (apply approximately the same dBs here as the compressor reducts)
Furthermore, I tend to use the following on my master stereo insert:
* EQ
* Compressor (4:1 ratio, around 10-30ms attack, around 0.3 seconds or auto release, and a gain reduction of approx. 2-5 dB, hard knee - preference is eg. SSL G Series, Waves plug, Digidesign Impact plug etc.)
* Limiter/maximizer (fast attack release, high ratio - Waves L2 og Digidesign Maxim)
Its all about balance. Listen to the kick and the bass at the same time, and mix the volumes so that both sounds are complemented and sounding clear.
Before you balance the volumes, I would consider the transient element of the sounds. To make the kick and bass punch the sound needs to be transient in some way. You can give this by applying some compression with around 40-80ms attack (to make the amplitude envelope have a noticable peak at the beggining), or by applying a fast pitch envelope from high to low (which makes the sound truly transient).
When making a bass i tend to use more than two channels, you can seperate them by frequencies (i use kontakt for this) then you can manipulate each one seperately, whether using distortin or filters etc.
I like to cut my kicks at 100 and then sidechain them to the bassline to make them come through with more punch.
As for compression, I often make clone channels of the bass and put them into individual slots to filter different frequencies, then adjust the levels and mash the lot together using compressor and a limiter on the master. And then resample.
Side-chaining (http://en.wikipedia.org/wiki/Audio_level_compression#Side-chaining)
Take a parametric EQ and set one of the bands to a very narrow curve, with about 5db of gain. Loop your kick, soloed, and slowly roll the parametric's frequency around until you find several places that "tighten" or emphasize its sound. The lowest of those is the kick's fundamental harmonic, and the others are overtones. There are some frequencies which might make the kick's tone sound weaker or more "dead" - sometimes EQing the "bad frequences" down a bit actually makes the kick sound stronger and more pure; sometimes not.
Now, do this with your bassline (soloed), using a note of whatever key it's written in. That is, if the first or main note of the bassline is an E, use a repeated E note to find its fundamental and overtones.
Now you have this information for both the kick and the bass, so you can use your EQ to make room for both of them. It's not likely that both will have the same fundamental, so EQ the bass with a reasonably narrow EQ curve about negative 5 to 10 dbs deep at the kick's fundamental, and perhaps at some of its other strong overtones. This will provide "space" for the kick. You can do the same with the kick's EQ. Experiment with which overtones etc you emphasize or lower the volume of, and how wide/deep your curves are. It's more of an art than a science... sometimes you can even get rid of the fundamental and just go with the overtones - do what sounds right. I use the Logic channel EQ for this so I can kind of "cheat" by having it show the freqs graphically.
You can do whatever works and makes it sounds stronger. I usually boost the fundamental of the kick a few db, cut out anything in the kick below the fundamental and maybe cut some where the bass' fundamental is. Then, I move over the the bass ' EQ, and cut the bass ' EQ where the kick's fundamental is. After that I use the EQ on the higher overtones of the bass or the kick if I want to emphasize more mid or top end.
You want them to sit well together, but certain frequencies are much more important to their sound than others. So you need to find and work with those important freqs.
Generally, the overtones will be multiples of the fundamental, due to the mathematics of how sounds are made. Soooo if my kick's fundamental is 135hz, there are probably overtones at like 270, 540 etc. Don't boost more than a few db or it will start to sound shitty though.
MISC TIPS/TRICKS
The Random Tips Thread
Volume:
you know your always turning the volume up to 'see how things will sound' - quickest way to spanner your ears permanently, and also tire yourself out with hearing fatigue nice & quick. I used to set myself an alarm for every half hour or so to remind me to turn it back down to a reasonable level.
tweaks and parameter changes:
a small idea that helps me alot. when im tweaking knobs on vsts or on reason devices i try to make every change in the same increments (usually 10 12 or 16 depending on the parameter.) this wont always get you the sound your after but it will get it close and keep things from getting too crazy if your a tweak freak. you can go back thru after and set things just right. always having a base to start from helps keep things in order. im a huge automation junkie and doing live mods is the easiest way for me to make sick basslines. set a loop of your bassline and hit record and start incrementally twisting knobs, flipping thru filters ect. do your best to do it on beat and you can get some really freaky things going on. if your timing was off just go edit the automation curves. hope this helps someone.
on tracks already bounced to wav/aif:
if you have a part thats dull or just not keeping up with the rest of the song, before you start trying to throw processing at it to get it louder just try duplicating the sequencer track for it. this can add alot of thickness to a sound. this also can cause a loss of definition and timbre however so duplicate it the least amount of times possible.. the goal is to get it balanced out with the other parts of the song not to take it to what you think should be its final volume. that should happen later when you brickwall it with your limiter.
or try duplicating a track then pitch shifting it up or down an octave.. this can increase the presence of the sound and make it more interesting all in one shot. ive used it lots for layering strings and pads and what not.
on sounds not yet bounced to wav/aif
such as a synth or bassline coming from a malstrom box or vst ect.
duplicating these types of tracks not only increases their volume but can have drastic effects on the overall sound since you are increasing the signal thats passing through whatever filters/oscillators/envelopes your using on it. if you cant quite get the sound your after out of a device after tweaking it try duplicating its sequencer track and/or adjusting the velocities and going back and trying to tweak it some more. you just might find what youre after. i do this sometimes even on tracks that are fine volume wise. duplicating the track then cutting the devices master volume back down will still net you some new sounds since the base signal to the device is still being altered.
THOUGHTS
I used to seek new gear as I thought it was going to improve my sound. I wish someone would have told me this:
Make your samples as loud as possible before sequencing them
Sculpt the individual sounds you want by combining samples
Learn about envelopes, lfos, compressors and EQ
Finish your tunes
If you are comfortable using fruityloops then stick with it. You will know when you have outgrown it. All the skills you pick up will be transferable to other software
Best advice someone could give. I also started out trying every VST, sequencer, sample-disk i could get my hands on. Just to learn that they're all worthless if you can't use them at their full potential. That's why most producers only use a small set of VST's, one sequencer-program they're comfortable with and read up on studio-techniques.
The main thing is persistence. i still have a long way to go, but the journey is more important than the destination. Just keep on trying stuff out and you'll eventually settle down and find your own way.
Some other random advice:
- Listen to your loops/tunes on as many speakersets you can get your hands on, in the car, on a stereosystem, in headphones, try to play them on a big rig somewhere at a party (if you organise raves yourself, just play them during the soundcheck), ...
- Teaming up with another producer also helps since you come to know a lot of little tricks he/she uses and you'll learn what you need to do to transport your tracks to someone else.
- Think about every little detail. I often find myself pondering during work on how to progress on a track and i make it a habit to send myself email when i think of something so i can try it out later at home.
Anyway. All this advice is futile if you aren't having fun making beats.
MASTERING/PLUGS
1. What should I avoid in a track's mix?
Sibilance, Out of phase audio, Flat topped mixes, Excessive digital peak limiting and or compression, Excessive high frequencies (you dont want to wake up the dogs) too much sub harmonic frequencies, Narrow Q parametric EQ settings with more than 2db of boost,
2. Where should my peak dB be?
24bit =-6dbfs/16bit = -2or3dbfs
3. I've noticed that the max time per side on a dub plate depends on the output level... what's the advantage of a higher output level/why does it shorten the amount of time per side?
10 = 6-7 Mins.12 = 10mins.
You can always get longer but the level will be reduced. More level = wider grooves and wider swings which takes up more land.
4. Any master EQ suggestions?
Just make a balanced mix that sounds good on a couple of systems.
5. Other tips/tricks?
You should never need to use a multi band compressor on your mixes thats pure laziness. Ask the cutting engineer what you can do to your mixes to make them better. LISTEN TO WHAT HE/SHE SAYS, if he/she is unwilling to comment choose another company.
Contact the company before you go to find out which formats they accept or prefer, assumption is the mother of all f*** ups.
Do not take to many people with you because they are an unnecessary distraction.
Do not be disheartened if the engineer is not complimentary on you mix just try harder next time.
Do not ask the engineer what he thinks of your track from an artistic point of view, He or she is a cutting engineer not an A+R person.
Here's some tips:
* Mixdown your tune to the best of your abilities, but don't use any mastering plugins or anything like that - any good cutting house will give your tune a bit of mastering before the cut, and this will be with much better equipment than anything you have unless you've got some serious kit. The ideal is to just bounce the track down from your sequencer and leave it clean.
* Record your tune out as loud as possible, but give them a bit of headroom to work with so don't whack it up to 0dB or anything silly. This will allow them to work the bass and cut as loud as poss.
* You can roll off everything below about 30Hz (ish), although again any mastering/cutting house worth their salt will do this anyway.
*All low-end (about 500Hz ish and below) should be in Mono.
Settings all vary depending on the tune, little bit of eq, little bit of compression, little limiting
I aint a mastering engineer but if im playing them out then they may need a bit of each
if you are getting them mastered proffesionally dont eq, compress or limit them at all.
Best advice i can give you is to bounce every track to wavs as loud as possible.
Start a new project and load in all your wavs, then mix them so the final mix is as loud as you can get with everything balanced out right.
Then bouce it down to wav, LISTEN to it a few times, use an eq if there are any frequencies you feel are painful use narrow band and sweep across with high +ve db to find the frequencies that are bad and use a gentle cut and wide bandwith, if it needs compressing do it at a low ratio noone really likes overly compressed music well at least it hurts my ears when everything is squashed flat and turned up as loud as possible.
Try the URS EQ's and compressors. Super fat. Make WAves plugs sound like Fisher Price My First plugins.
URS BLT (iirc) is a great tool, its a bass knob and a treble knob. Turn them up or down. Great for adding a little more bass and a bit more crispyness to a mix.
I just got the URS console comrpessor and thats awesome. Its bascially a channel strip so its a compressor and simple eq in one. Use it on every channel to give just a little more of what you need, and overall the effect is stunning. Its compression works wonders for drum tracks...
Also for general eq duties try the URS Fulltec eq. It makes anything and everything osund better......... often when i think something doesn;t need it i slap it on anyway and it invariably sounds better.
Bounce all you r tracks separately (or according to frequency similarities) and open them again in your sequencer
Start with (duh!) drums and bass first
Apply compression + eq (normal order is first compression, then eq), when rendering, leave some headroom (i generally render to +/- -2dB).
I do my final rendering/mastering in wavelab with the PSP Vintagemeter and the Waves bundle.
Think about your sequencer/editing application's preferences (meter-sensitivity), make sure your level indicator is responding fast/accurately, and boost everything up to 0 dB without clipping if possible.
But off course your ears will tell you more than anything
I usually import a track of which i'm sure it sounds good on different systems, anaylse it with wavelab, and then try to (more or less) copy these characteristics
and, oh yeah, wavelab rules!!
I go about the mixdown a bit differently. once i have my song laid out,i mean everything laid out-samples, drums, instruments etc. i adjust the levels, eqing, compression, effects etc from the arrange window. i used to bounce my drums to audio but i found they sound better, are more present in the mix just as midi. when its all sounding good, i bounce to aiff, listen and make adjustments until it sounds right on even the shittiest stereo(my car)..any suggestions? i have used a good deal of advise that i have recieved from you guys, all of which have made my tracks sound better and better.
Don't know if I'm doing it by the book exactly but after reading a bunch of stuff in future music mag and music tech I found if you put a limiter/compressor/chain on the master outs of your digital mixer then it will give you way more ceiling room with your master levels without distorting. I guess this is done idealy with expensive outboard gear befor going in to your board.(???) but not having a board or proper monitors I cheat just to preview my tunes at the club or in a mix w. records.
The reason for using master inserts is for making it all "come together". Google SSL G Series Stereo (or Quad) Compressor - this compressor is very often described as the "final glue" on a mix. The reason for using an EQ is also to colour the sound; some mixes tend to be too bright, lack low mid range etc. This is of course a typical mastering job, but a lot of engineers tend to do it too. And I do it all the time. Try it!
The thing that many people (myself included) forget about compression is that with the attack/release settings, you can get that pumping effect that is desirable in a driving track. If you sidechain your compressor to your kick drum, you can also then get the compression effect to activate in time with your drum patterns, making the bass tight to the kick.
For Cubase SX.
4Front XLimiter- -2.1, -2.0, -2.7
VSTDynamics- full dynamics preset
MultibandCompressor- FM preset,
set eq: (low)1.5, (med)0, (medhi)1.5, (hi)1.8 GAIN-1db
After doing this you overall vol will be much lower and you should be able to push the master volume of the entire tune instead of each individual track. (still do all the above metioned stuff (pspwarmer - drums, compress bass, cut highs from kicks n bass etc.) before slapping on the master chanel plugins.
hope this helps...if there is a better way please correct me.
MISC PROGRAMS/LINKS
http://www.kvraudio.com/developer_challenge.php (these VSTs were made for an online competition so they have all been reviewed and have proven themselves)
http://www.tweakbench.com/ (Some very cool FREE toys including a decent bass synth)
http://odosynths.panicnow.net/vst.html (some are real cheesy but you might find something you really like)
http://www.wwaym.com/products.html : VSTs Synths, Bass & effects
TECHNICAL STUFF
http://www.dnbwiki.com
http://www.dnbwiki.com/index.php/808_bass
http://www.soundonsound.com/sos/dec00/articles/adcompression.htm
http://www.analogx.com/contents/download/audio/freq.htm
http://en.wikipedia.org/wiki/Harmonics
http://en.wikipedia.org/wiki/Frequency
http://en.wikipedia.org/wiki/Music_scale
http://tomscarff.tripod.com/midi_analyser/midi_note_frequency.htm
Kontakt wobble tutorial by deadly habit
ok here we go quick kontakt tutorial and automation
i have a waveform i generated in another synth loaded up
first thing we'll be working with is group insert fx
from the drop down menu choose filters and in this case i'm using 6-pole low pass:

ok now you see the lp6 filter is open and we have the cutoff and resonation knobs
obviously you can adjust these i'll let yall experiment:
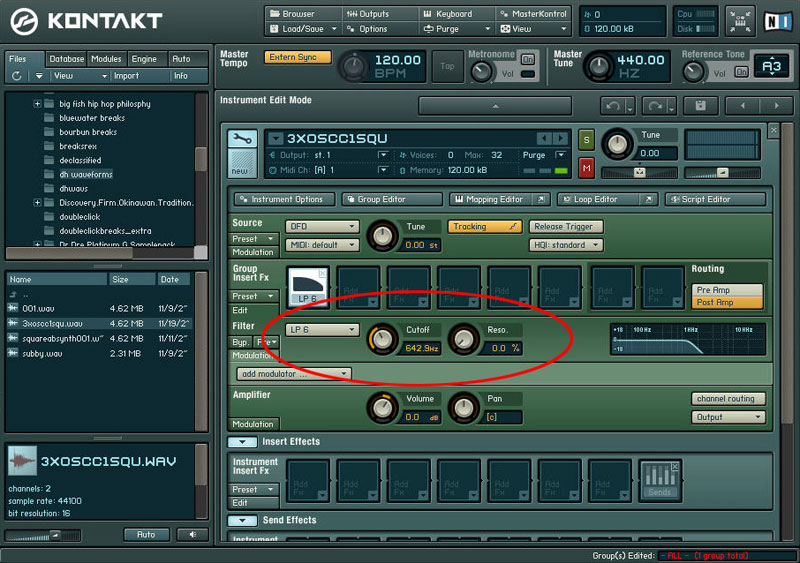
next right below it under modulation
choose lfos and sine for that smooth up and down transition:

ok here you can see the modulation link is assigned to cuttoff freqency and at 100% on the slider
at the bottom you can see the actual lfo
here you can adjust the frequency of it or have a fade in to it if ya want

ok here you see me adjusting the percent the modulator (lfo)
is going to affect the cuttof frequency's movement:

now in the auto (automation) tab to the left
choose host automation:

next drag and drop host parameter 000 onto the intensity slider on the modulation:

now if you expand your kontakt window #000 param should be there
now you can draw in the automation for the slider:
 [/url] [/url]
Last edited by Daft Cunt on Mon Aug 04, 2008 12:35 pm; edited 37 times in total |
|
